今天小编给大家分享一下Python如何使用Rich type和TinyDB构建联系人通讯录的相关知识点,内容详细,逻辑清晰,相信大部分人都还太了解这方面的知识,所以分享这篇文章给大家参考一下,希望大家阅读完这篇文章后有所收获,下面我们一起来了解一下吧。
我们将学习如何构建一个终端应用程序(CLI应用程序)来管理我们的通讯录
我们将使用type来构建CLI应用程序,使用Rich来创建彩色终端输出,使用TinyDB来创建数据库。
我们将在这个项目中使用一些外部库。让我们来了解一下,并逐一安装。 但是在我们安装之前,让我们创建一个虚拟环境并激活它。 我们将使用 virtualenv 创建一个虚拟环境。Python现在附带了一个预先安装的virtualenv库。因此,要创建一个虚拟环境,你可以使用下面的命令:
python -m venv env
上面的命令将创建一个名为env的虚拟环境。现在,我们需要使用下面的命令来激活环境:
. env/Scripts/activate
要验证环境是否已被激活,可以在终端中看到(env)。现在,我们可以安装库了。
Rich是一个Python库,用于向终端编写富文本(带有颜色和样式),并用于显示高级内容,如表、标记和语法高亮显示代码。
要安装Rich,使用以下命令:
pip install Rich
Typer是一个用于构建CLI应用程序的库。
要安装Typer,使用以下命令:
pip install Typer
TinyDB是一个纯Python编写的面向文档的数据库,没有外部依赖。
要安装TinyDB,使用下面的命令:
pip install TinyDB
我们的通讯录应用程序将是一个基于终端的应用程序。类似于Todo应用程序,我们可以对其执行以下操作:
Add (or Create) : You can add a new contact in the contact book.
Show (or Read) : You can see all your contacts saved in the contact book.
Edit (or Update) : You can edit the contacts saved in the contact book.
Remove (or Delete) : You can delete the contacts saved in the contact book.
首先,我们将为Contact创建一个自定义类或模型。想想接触应该包含的所有领域。 我能想到这些字段——姓名和联系电话。如果您能想到更多,可以将它们添加到您的模型中。我们现在要继续调查这两位。 创建一个名为contact_book的目录。在其中,创建一个名为model.py的Python文件。在文件中增加如下内容:
import datetime
class Contact:
    def __init__ (self, name, contact_number, position=None, date_created=None, date_updated=None):
        self.name = name
        self.contact_number = contact_number
        self.position = position
        self.date_created = date_created if date_created is not None else datetime.datetime.now().isoformat()
        self.date_updated = date_updated if date_updated is not None else datetime.datetime.now().isoformat()
    def __repr__ (self) -> str:
        return f"({self.name}, {self.contact_number}, {self.position}, {self.date_created}, {self.date_updated})"
我们创建了一个名为Contact的类,它接受两个强制参数:name和contact_number。
除了这两个参数外,它还接受三个可选参数:position、date_created和date_updated。如果没有传递这三个可选参数,它们将分别默认为当前索引和当前时间。
此外,我们还定义了repr方法,该方法以更易于阅读的方式返回对象。
现在,让我们设置TinyDB并创建一个数据库
在contact_book目录中,创建一个init.py文件,并添加以下内容:
from tinydb import TinyDB, Query
db = TinyDB('contact-book.json')
db.default_table_name = 'contact-book'
ContactQuery = Query()
我们已经创建了TinyDB类的一个实例,并将文件名传递给它。这将创建一个JSON文件通讯录。Json,我们的数据将被存储。要从这个数据库检索数据,我们需要一个tinydb库中Query类的实例。
现在,让我们定义将用于与数据库交互的不同函数。在contact_book目录中,创建一个database.py文件,并在其中添加以下内容:
from typing import List
import datetime
from contact_book.model import Contact
from contact_book import db, ContactQuery
def create(contact: Contact) -> None:
    contact.position = len(db)+1
    new_contact = {
        'name': contact.name,
        'contact_number': contact.contact_number,
        'position': contact.position,
        'date_created': contact.date_created,
        'date_updated': contact.date_updated
    }
    db.insert(new_contact)
def read() -> List[Contact]:
    results = db.all()
    contacts = []
    for result in results:
        new_contact = Contact(result['name'], result['contact_number'], result['position'],
                              result['date_created'], result['date_updated'])
        contacts.append(new_contact)
    return contacts
def update(position: int, name: str, contact_number: str) -> None:
    if name is not None and contact_number is not None:
        db.update({'name': name, 'contact_number': contact_number},
                  ContactQuery.position == position)
    elif name is not None:
        db.update({'name': name}, ContactQuery.position == position)
    elif contact_number is not None:
        db.update({'contact_number': contact_number},
                  ContactQuery.position == position)
def delete(position) -> None:
    count = len(db)
    db.remove(ContactQuery.position == position)
    for pos in range(position+1, count):
        change_position(pos, pos-1)
def change_position(old_position: int, new_position: int) -> None:
    db.update({'position': new_position},
              ContactQuery.position == old_position)
我们定义了四个不同的函数——create()、read()、update()和delete()用于上面提到的每个操作。我们使用position属性来识别特定的联系人。change_position()函数负责在删除联系人时保持联系人的位置。
现在让我们使用type创建CLI。在contact_book目录之外,创建一个main.py文件,并添加以下内容。如何使用type创建命令行
import typer
app = typer.Typer()
@app.command(short_help='adds a contact')
def add(name: str, contact_number: str):
    typer.echo(f"Adding {name}, {contact_number}")
@app.command(short_help='shows all contacts')
def show():
    typer.echo(f"All Contacts")
@app.command(short_help='edits a contact')
def edit(position: int, name: str = None, contact_number: str = None):
    typer.echo(f"Editing {position}")
@app.command(short_help='removes a contact')
def remove(position: int):
    typer.echo(f"Removing {position}")
if __name__ == " __main__":
    app()
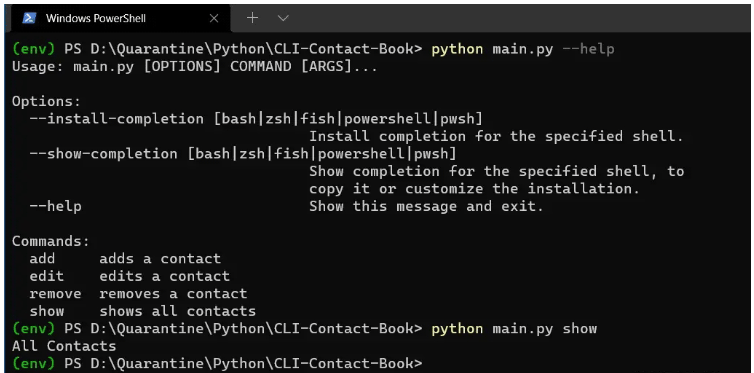
首先,我们从类型库中创建Typer类的一个实例。然后,我们为上面讨论的四个操作创建四个单独的函数。我们使用@app.command()装饰器将每个函数绑定到一个命令中。我们还添加了short_help来帮助用户使用命令。
要添加联系人,我们需要name和contact_number参数。为了展示隐形人,我们什么都不需要。要编辑联系人,我们肯定需要位置,而name和contact_number参数是可选的。要移除接触点,我们只需要位置。
目前,我们没有在方法内部进行任何操作。我们只是使用typing类中的echo方法进行打印。在main方法中,我们只需要调用app()对象。
如果你运行这个应用程序,你会得到一个类似的输出:

我们希望在一个漂亮的表格布局中使用不同的颜色显示联系人。Rich 可以帮我们。
现在让我们修改main.py中的show()函数,因为它负责在终端上打印联系人。
from rich.console import Console
from rich.table import Table
console = Console()
@app.command(short_help='shows all contacts')
def show():
    contacts = [("Ashutosh Krishna", "+91 1234554321"),
                ("Bobby Kumar", "+91 9876556789")]
    console.print("[bold magenta]Contact Book[/bold magenta]", "????")
    if len(contacts) == 0:
        console.print("[bold red]No contacts to show[/bold red]")
    else:
        table = Table(show_header=True, header_, show_lines=True)
        table.add_column("#", , width=3, justify="center")
        table.add_column("Name", min_width=20, justify="center")
        table.add_column("Contact Number", min_width=12, justify="center")
        for idx, contact in enumerate(contacts, start=1):
            table.add_row(str(idx), f'[cyan]{contact[0]}[/cyan]', f'[green]{contact[1]}[/green]')
        console.print(table)
我们首先创建了Console类的一个实例。在show()方法中,我们现在有一个虚拟的联系人列表。使用console对象,我们用粗体红色打印标题。
接下来,我们创建一个表并添加列。现在,我们对联系人进行迭代,并将它们作为不同颜色的单独行放入表中。最后,我们打印表格。
现在,让我们进行最后一步,将数据库操作与命令连接起来。也就是说,当我们运行一个命令时,它应该与数据库进行适当的交互。
import typer
from rich.console import Console
from rich.table import Table
from contact_book.model import Contact
from contact_book.database import create, read, update, delete
app = typer.Typer()
console = Console()
@app.command(short_help='adds a contact')
def add(name: str, contact_number: str):
    typer.echo(f"Adding {name}, {contact_number}")
    contact = Contact(name, contact_number)
    create(contact)
    show()
@app.command(short_help='shows all contacts')
def show():
    contacts = read()
    console.print("[bold magenta]Contact Book[/bold magenta]", "????")
    if len(contacts) == 0:
        console.print("[bold red]No contacts to show[/bold red]")
    else:
        table = Table(show_header=True,
                      header_, show_lines=True)
        table.add_column("#", , width=3, justify="center")
        table.add_column("Name", min_width=20, justify="center")
        table.add_column("Contact Number", min_width=12, justify="center")
        for idx, contact in enumerate(contacts, start=1):
            table.add_row(str(
                idx), f'[cyan]{contact.name}[/cyan]', f'[green]{contact.contact_number}[/green]')
        console.print(table)
@app.command(short_help='edits a contact')
def edit(position: int, name: str = None, contact_number: str = None):
    typer.echo(f"Editing {position}")
    update(position, name, contact_number)
    show()
@app.command(short_help='removes a contact')
def remove(position: int):
    typer.echo(f"Removing {position}")
    delete(position)
    show()
if __name__ == " __main__":
    app()
在上面的代码中,我们使用了前面创建的create()、read()、update()和delete()。
以上就是“Python如何使用Rich type和TinyDB构建联系人通讯录”这篇文章的所有内容,感谢各位的阅读!相信大家阅读完这篇文章都有很大的收获,小编每天都会为大家更新不同的知识,如果还想学习更多的知识,请关注亿速云行业资讯频道。
免责声明:本站发布的内容(图片、视频和文字)以原创、转载和分享为主,文章观点不代表本网站立场,如果涉及侵权请联系站长邮箱:is@yisu.com进行举报,并提供相关证据,一经查实,将立刻删除涉嫌侵权内容。