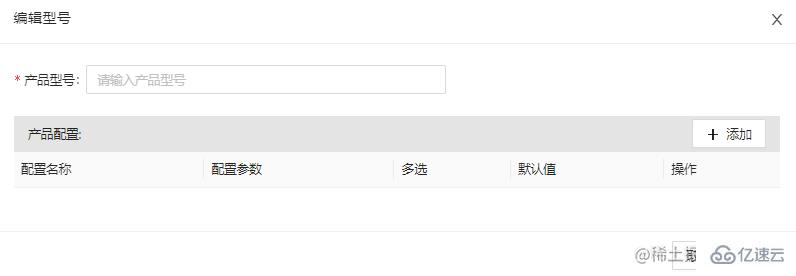
本篇内容介绍了“Angular中如何使用FormArray和模态框”的有关知识,在实际案例的操作过程中,不少人都会遇到这样的困境,接下来就让小编带领大家学习一下如何处理这些情况吧!希望大家仔细阅读,能够学有所成!
使用FormArray制作动态表单。每创建一个表单,页面就新增一个input显示表单填写的标题,点击编辑再跳转到点击表单的填写内容。
    // 封装获取modelList
    get modelList() {
        return this.formGroup.get('modelList') as FormArray
    }
    constructor(private fb: FormBuilder) {}
    ngOnInit() {
        // 一开始初始化arr为空数组
        this.formGroup = this.fb.group({
            // 内部嵌套FormControl、FormArray、FormGroup
            modelList: this.fb.array([])
        })
    }
    // 模态框构造内部的表单
    function newModel() {
        return this.fb.group({
            modelName: [''],
            // 可以继续嵌套下去,根据业务需求
        })
    }
    // 省略模态框部分代码
    // 传递到模态框的FormArray
    selectedType: FormArray


<form [FormGroup]="formGroup">
    <div FormArrayName="modelList">
        <ng-container *nfFor="let item of modelList.controls;let i = index" [FormGroupName]="i">
            <nz-input-group
                [nzSuffix]="suffixIconSearch"
              >
                <input type="text" nz-input formControlName="modelName"/>
              </nz-input-group>
              <ng-template #suffixIconSearch>
                <span
                  nz-icon
                  nzType="edit"
                  class="hover"
                  (click)="showModal(i)"
                ></span>
              </ng-template>
        </ng-container>
    </div>
</form>
<nz-modal
  [(nzVisible)]="isVisible"
  nzTitle="Model"
  [nzFooter]="modalFooter"
  (nzOnCancel)="handleCancel()"
  (nzOnOk)="handleOk()"
>
  <ng-container *nzModalContent>
    <form nz-form [formGroup]="selectedType">
      <nz-form-item>
        <nz-form-label nzRequired>Model Test</nz-form-label>
        <nz-form-control>
          <input
            type="text"
            nz-input
            placeholder="请输入ModelName"
            formControlName="modelName"
          />
        </nz-form-control>
      </nz-form-item>
      <nz-form-item>
        <nz-form-control>
          <product-config></product-config>
        </nz-form-control>
      </nz-form-item>
    </form>
  </ng-container>
  <ng-template #modalFooter>
    <button *ngIf="!isNewModel" nzDanger nz-button nzType="default" (click)="handleDelete()">删除</button>
    <button *ngIf="isNewModel" nz-button nzType="default" (click)="handleCancel()">取消</button>
    <button nz-button nzType="primary" (click)="handleOk()">保存</button>
  </ng-template>
</nz-modal>
由于这种模态框比较特殊,割裂了表单的FormGroup之间的关系,在点击的时候需要传递参数到模态框显示部分值,如果单纯传递参数使用this.modelList.at(index)获取实体到模态框上进行赋值修改,在模态框点击保存后会发现修改的值没有在表单更新,而表单上对input值修改发现可以影响到模态框的内容。
但是模态框新增的表单却可以响应到页面中去。
点击编辑后,将点击的FormArray的元素传递给一个临时变量 this.selectedType = <FormGroup>this.modelList.at(index);,并且对模态框表单传值。
模态框点击保存再将原FormArray的值重新替换
this.modelList.removeAt(this.modelIndex)
this.modelList.insert(this.modelIndex, this.selectedType)
点击新增,创建一个新的FormGroup对象
保存添加push到原页面的FormArray中
newModelType(): FormGroup {
    return this.fb.group({
      modelName: ['', Validators.required],
      configList: this.fb.array([]),
    });
  }
// ...省略
// 模态框显示
show() {
    this.isVisible = true
    this.selectedType = this.newModelType();
}
// 保存
save() {
    this.isVisible = false
    // 原页面FormArray
    this.modelList.push(this.selectedType);
}
最后发现这种写法只能够单向改变,页面外input修改值会影响到模态框,但是模态框的值改变保存却让外部没有更新。通过console方式查看页面的FormArray内部参数发现其实是有改变的,只是angular没有检测到。这个时候判断没有发生响应的原因一般是没有触发angular检测机制,仔细查看文档发现有一行很重要 angular文档在最下面写着

原本第一次阅读的时候,觉得我遵守了这种原则,因为在编辑的时候,我选择了操控原FormArray进行元素删除和插入,是遵循了这种规则,但是实际上在模态框赋值就已经违反了这种原则,我在赋值的时候拿了FormArray的元素实例赋值给模态框的临时变量,然后更改实例的值,又重新删除插入,本质上我操作的是同一个实例,所以angular没有检测到发生变化【虽然值发生改变】

在赋值的地方不能偷懒,仍然要重新创建新对象,再拿原对象的赋值。【相当于深拷贝】
      this.selectedType = this.newModelType();
      const old = this.modelList.at(index);
      this.selectedType.setValue({
        'modelName': old.get('modelName').value
    })
这时候就可以正常更新了。
“Angular中如何使用FormArray和模态框”的内容就介绍到这里了,感谢大家的阅读。如果想了解更多行业相关的知识可以关注亿速云网站,小编将为大家输出更多高质量的实用文章!
免责声明:本站发布的内容(图片、视频和文字)以原创、转载和分享为主,文章观点不代表本网站立场,如果涉及侵权请联系站长邮箱:is@yisu.com进行举报,并提供相关证据,一经查实,将立刻删除涉嫌侵权内容。