一、nagios简介
1、一款开源的电脑系统和网络监视工具,可以有效监控windows、Linux和Unix的主机状态
,交换机、路由器等网络设置。在系统或服务状态异常时发出邮件或者短信报警,第一
时间通知支离维人员,在状态恢复后发出正常的邮件或者短信通知。
2、主要功能
网络服务监控(SMTP、POP3、HTTP、NNTP、ICMP、SNMP、FTP、SSH)
主机资源监控(CPU load、disk usage、system logs),也包括Windows主机(使用NSClient++ plugin)
可以指定自己编写的Plugin通过网络收集数据来监控任何情况
可以通过配置Nagios远程执行插件远程执行脚本
远程监控支持SSH或SSL加通道方式进行监控
简单的plugin设计允许用户很容易的开发自己需要的检查服务,支持很多开发语言
包含很多图形化数据Plugins(Nagiosgraph、Nagiosgrapher、PNP4Nagios等)
可并行服务检查
能够定义网络主机的层次,允许逐级检查,就是从父主机开始向下检查
当服务或主机出现问题时发出通告,可通过email, pager, sms 或任意用户自定义的plugin进行通知
能够自定义事件处理机制重新激活出问题的服务或主机
自动日志循环
支持冗余监控
包括Web界面可以查看当前网络状态,通知,问题历史,日志文件等
二、nagios工作原理
1、Nagios的功能是监控服务和主机,但是他自身并不包括这部分功能,所有的监控、检测功能都是通过各种插件来完成的。
2、Nagios4种状态返回信息
0(OK)表示状态正常/绿色
1(WARNING)表示出现警告/***
2(CRITICAL)表示出现非常严重的错误/红色
3(UNKNOWN)表示未知错误/深***
3、Nagios 通过NRPE 来远端管理服务
Nagios 执行安装在它里面的check_nrpe 插件,并告诉check_nrpe 去检测哪些服务。
通过SSL,check_nrpe 连接远端机子上的NRPE daemon
NRPE 运行本地的各种插件去检测本地的服务和状态(check_disk)
最后,NRPE 把检测的结果传给主机端的check_nrpe,check_nrpe 再把结果送到Nagios状态队列中。
Nagios 依次读取队列中的信息,再把结果显示出来。
三、nagios安装(CentOS7)
1、lamp环境搭建
(1)源码安装apr-1.5.2和apr-util-1.5.4
cd apr-1.5.2
./configure && make && make install
cd apr-util-1.5.4
./configure --with-apr=/usr/local/apr/ && make && make install
(2)安装openssl-devel
#mod_ssl has been requested
yum -y install openssl-devel
(3)源码安装httpd-2.4.17
#./configure --prefix=/usr/local/apache2 --sysconfdir=/etc/httpd/ --enable-so --enable-ssl=static --with-ssl=/usr/local/ssl/ --enable-mods-shared=all --with-apr=/usr/local/apr/ --with-apr-util=/usr/local/apr/ --enable-cgi --enable-suexec
./configure --prefix=/usr/local/apache2 --sysconfdir=/etc/httpd/ --enable-so --enable-ssl=static --with-ssl=/usr/local/ssl/ --enable-mods-shared=all --with-apr=/usr/local/apr/ --with-apr-util=/usr/local/apr/ --enable-cgi
make && make install
(4)源码安装mysql-5.6.27-linux-glibc2.5-x86_64
#FATAL ERROR: please install the following Perl modules before executing scripts/mysql_install_db:Data::Dumper
yum -y install perl-Data-Dumper
tar zxvf mysql-5.6.27-linux-glibc2.5-x86_6.tar.gz -C /uar/local/
cd /usr/local
ln -s mysql-5.6.27-linux-glibc2.5-x86_64/ mysql
cd mysql
#添加mysql用户和群组
groupadd mysql
useradd -r -g mysql mysql
#修改相关目录和文件属主和所属群组
chown -R mysql .
chgrp -R mysql .
或者:chown -R mysql:mysql .
#将目录属主更改为root,避免mysql用户将目录删除
chown -R root .
chown -R mysql data
#使用mysql用户权限来初始化数据库
scripts/mysql_install_db --user=mysql
#将mysql添加为服务
cp support-files/mysql.server /etc/init.d/mysqld
chkconfig --add mysqld
#将mysql的bin目录加入到PATH环境变量
#在/etc/profile最后面添加
echo "PATH=$PATH:/usr/local/mysql/bin">>/etc/profile
source /etc/profile
#脚本初始化已经添加mysqld脚本,如果没有直接cp /etc/init.d/mysqld
/etc/rc.d/init.d/mysqld
#启动mysql
mkdir -p /var/run/mysqld/
chown -R mysql:mysql /var/run/mysqld/
#/var/log/mariadb/mariadb.log No such file or directory
mkdir -p /var/log/mariadb/ /var/run/mariadb/
touch /var/log/mariadb/mariadb.log
chown root:mysql /var/log/mariadb/mariadb.log /var/run/mariadb/
chmod -R 774 /var/log/mariadb/mariadb.log /var/run/mariadb/
/usr/local/mysql/bin/mysqld_safe &
ln -s /var/lib/mysql/mysql.sock /tmp/mysql.sock
#在/etc/my.cnf 文件socket参数指定为/tmp/mysql.sock
echo "socket=/tmp/mysql.sock">>/etc/my.cnf
#修改root密码为love
#mysqladmin -u root -p password love --socket=/var/lib/mysql/mysql.sock
mysqladmin -u root -p password love
(4)源码安装php-5.6.15
#apxs是在安装php时生成动态连接模块工具,如果不指明路径,apache就无法调用php
#一定要添加--with-apxs2=/usr/local/apache2/bin/apxs
#php安装完成后,可以看到会在httpd.conf文件添加"LoadModule php5_module modules/libphp5.so"
#安装依赖包libxml2-devel
#error: xml2-config not found. Please check your libxml2 installation
yum -y install libxml2-devel
#libzip:not found
yum -y install libzip-devel
#动态加载php来完成解析
#./configure --prefix=/usr/local/php --with-config-file-path=/etc --with-mysql=/usr/local/mysql/ --with-apxs2=/usr/local/apache2/bin/apxs
./configure --prefix=/usr/local/php --with-config-file-path=/etc --with-mysql=/usr/local/mysql/ --with-apxs2=/usr/local/apache2/bin/apxs --enable-mbstring --with-libzip --enable-zip
make && make install
cp php.ini-development /etc/php.ini
#不需要进行手动更改就可以让apache调用php
#php在编译的时候会修改httpd.conf配置文件,添加如下一行
LoadModule php5_module modules/libphp5.so
#如果在编译的时候没有指定--with-apxs2=/usr/local/apache2/bin/apxs,则apache无法加载php
(5)lamp连接测试
#设置service方式启动apache
#将启动脚本复制为/etc/init.d/httpd
cp /usr/local/apache2/bin/apachectl /etc/init.d/httpd
#可以这样来停止、启动和重启apache
service httpd stop/start/restart
/etc/init.d/httpd stop/start/restart
/usr/local/apache2/bin/apachectl stop/start/restart
#或许是因为兼容性不好,无法使用chkconfig设置开机启动
chkconfig –add httpd
#但是可以修改/etc/rc.local设置apache开机启动
#在/etc/rc.local添加
/usr/local/apache2/bin/apachectl start
#修改httpd.conf:
#如果使用yum安装apache,配置文件存放在
/etc/httpd/conf/httpd.conf
#DocumentRoot为
/var/www/html
#如果是使用源码方法安装,配置文件存放在
/usr/local/apache2/conf/httpd.conf
#DocumentRoot为
/usr/local/apache2/htdocs
#在<IfModule></IfModule>添加如下两行,以便apache知道怎样解析php文件
AddType application/x-httpd-php .php .phtml
AddType application/x-httpd-php-source .phps
#修改ServerName
ServerName 192.168.137.40:80
#在htdocs目录添加文件index.php,内容如下
#读取mysql数据库中的数据表user内容
<?php
$con=mysql_connect("localhost","root","love");
$sql="select user,password from user";
$db_select=mysql_select_db("mysql",$con);
$result=mysql_query($sql,$con);
while ($row=mysql_fetch_array($result))
{
echo $row["user"]." ".$row["password"];
echo "<br/>";
}
mysql_close($con);
?>
#从mysql数据库中读取数据表user并显示
#加载cgi解析
#在"LoadModule php5_module modules/libphp5.so"后面添加
LoadModule cgi_module modules/mod_cgi.so
2、安装nagios-4.1.1
cd nagios-4.1.1
useradd nagios -M -s /sbin/nologin
#unzip: command not found
yum -y install unzip
./configure --prefix=/usr/local/nagios --with-nagios-group=nagios
make install && make all && make install-init && make install-commandmode && make install-config
cp sample-config/httpd.conf /etc/httpd/nagios.conf
#make install-exfoliation,因找不到目录而失败
#cp: target /usr/local/nagios/share/stylesheetsis not a directory
mkdir -p /usr/local/nagios/share/stylesheetsis
cp -rf contrib/exfoliation/stylesheets/* /usr/local/nagios/share/stylesheetsis/
#make install-classicui
#cp: target usr/local/nagios/share/stylesheetsis not a directory
cp -rf html/stylesheets/* /usr/local/nagios/share/stylesheets
#安装插件
cd nagios-plugins-2.1.1
./configure --with-gnutls --enable-perl-modules --enable-libtap --with-openssl --with-gnutls && make && make install
#Can't locate ExtUtils/MakeMaker.pm
yum -y install perl-CPAN
cpan -i ExtUtils::MakeMaker
#或者
yum -y install perl-ExtUtils-MakeMaker.noarch
#添加nagios管理用户
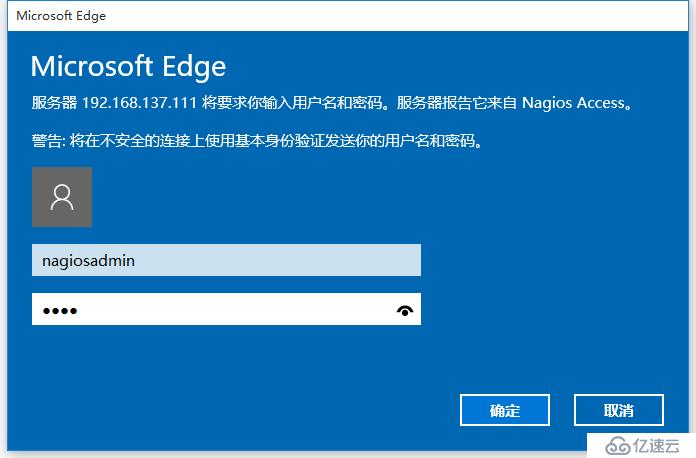
/usr/local/apache2/bin/htpasswd -c /usr/local/nagios/etc/htpasswd.users nagiosadmin
#检查配置文件
/usr/local/nagios/bin/nagios -v /usr/local/nagios/etc/nagios.cfg
#下面的是因为nagios没有启动,启动nagios即可
#Error: Could not read object configuration data!
/usr/local/nagios/bin/nagios -d /usr/local/nagios/etc/nagios.cfg
#打开浏览器访问,IP为实际IP或者域名,如果是域名一定要能够解析
http://192.168.137.222/nagios

3、监控windows主机
(1)安装NSCP-0.4.3.143-Win32.msi
#启用以下选项
Enable common check plugins
Enable nsclient server(check_nt)
Enable NRPE server(check_nrpe)
Secure(UserCertificates for authentication)
Enable NSCA client
Allow hosts:127.0.0.1,::1,192.168.137.111,192.168.137.8
password:123456
#配置文件存放于安装目录下的nsclient.ini
(2)查看nsclient++监控端口5666
netstat -anbv | find "5666"
(3)配置nagios
#命令行检查,检查系统运行时间
#-H:指定主机,-s:指定密码,-p:指定端口,-v:指定查询选项
/usr/local/nagios/libexec/check_nt -H 192.168.137.222 -s 123456 -p 12489 -v UPTIME
#检查CPU信息
#-w:警告比例;-c:紧急比例;-l:过去5分钟平均值,80%为警告,90%为紧急
/usr/local/nagios/libexec/check_nt -H 192.168.137.222 -s 123456 -p 12489 -v CPULOAD -w 80 -c 90 -l 5,80,90
#检查硬盘使用率
#-w:警告比例;-c:紧急比例;-l:指定盘符
/usr/local/nagios/libexec/check_nt -H 192.168.137.222 -s 123456 -p 12489 -v USEDDISKSPACE -w 80 -c 90 -l C
#在/usr/local/nagios/etc/command.cfg最后添加
define command{
command_name check_win
command_line $USER1$/check_nt -H $HOSTADDRESS$ -p 12489 -v $ARG1$ $ARG2$
}
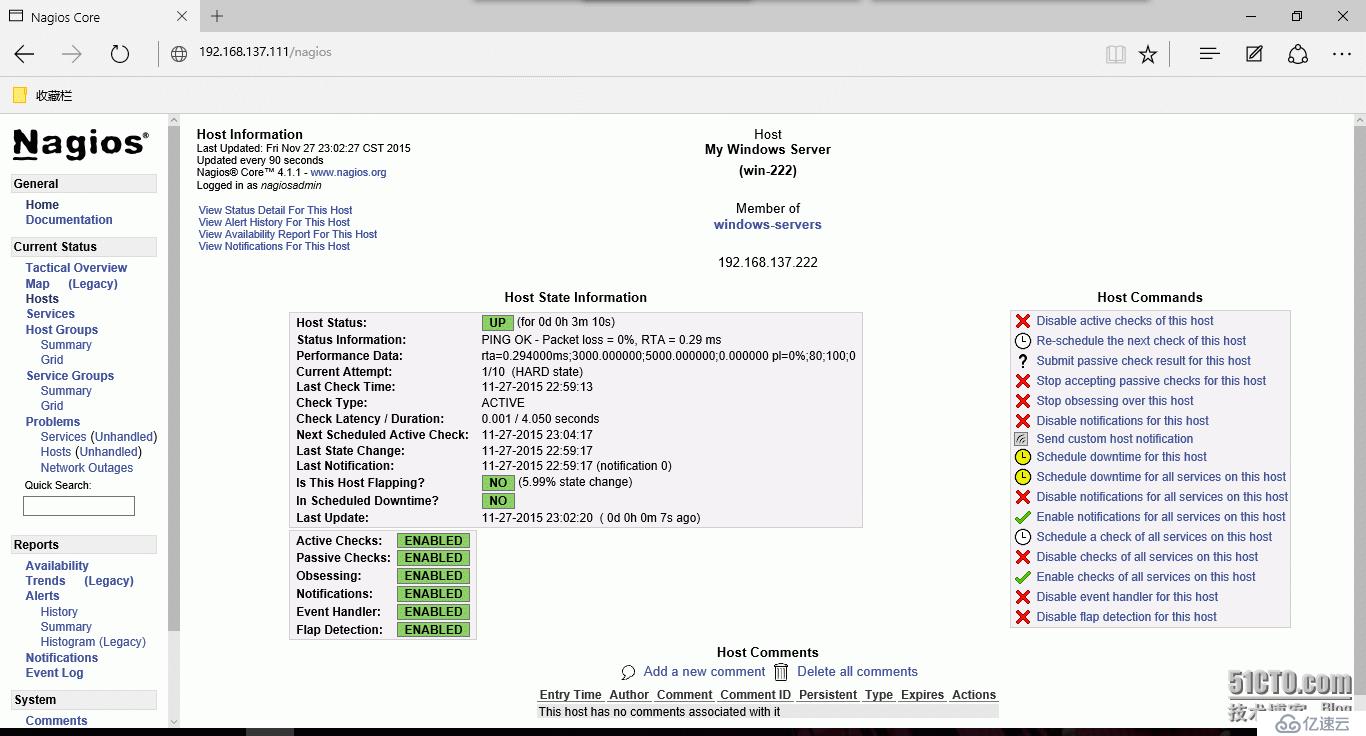
#复制/usr/local/nagios/etc/objects/windows.cfg一份win-222.cfg,并修改为
#继承模板/usr/local/nagios/etc/objects/template.cfg windows-server主机监控设置以及generic-service服务监控设置
#监控主机IP为192.168.137.222,被监控的服务分别为:系统运行时间、CPU负载、内存使用情况、C盘使用情况以及explorer.exe进程数
define host{
use windows-server ; Inherit default values from a template
host_name win-222; The name we're giving to this host
alias My Windows Server ; A longer name associated with the host
address 192.168.137.222 ; IP address of the host
}
define hostgroup{
hostgroup_name windows-servers ; The name of the hostgroup
alias Windows Servers ; Long name of the group
}
define service{
use generic-service
host_name win-222
service_description NSClient++ Version
check_command check_nt!CLIENTVERSION
}
define service{
use generic-service
host_name win-222
service_description Uptime
check_command check_nt!UPTIME
}
define service{
use generic-service
host_name win-222
service_description CPU Load
check_command check_nt!CPULOAD!-l 5,80,90
}
define service{
use generic-service
host_name win-222
service_description Memory Usage
check_command check_nt!MEMUSE!-w 80 -c 90
}
define service{
use generic-service
host_name win-222
service_description C:\ Drive Space
check_command check_nt!USEDDISKSPACE!-l c -w 80 -c 90
}
define service{
use generic-service
host_name win-222
service_description Explorer
check_command check_nt!PROCSTATE!-d SHOWALL -l explorer.exe
}
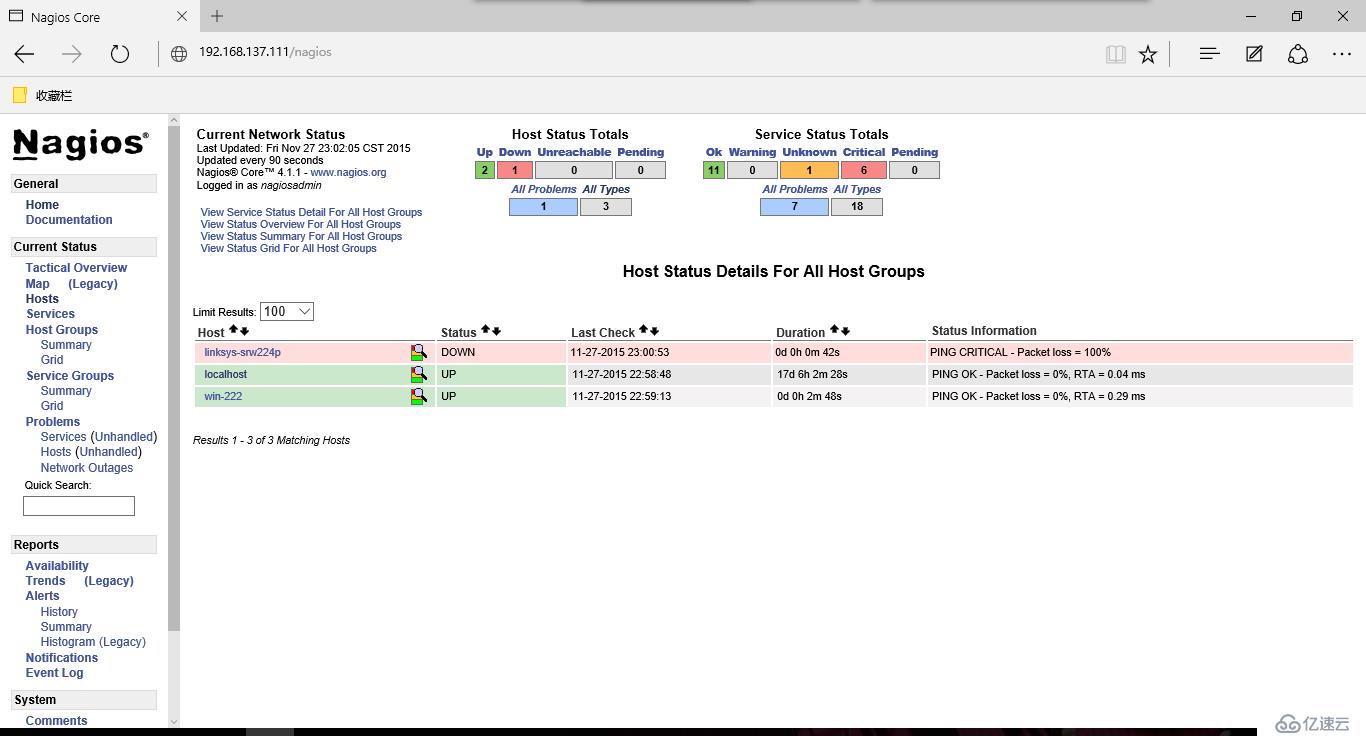
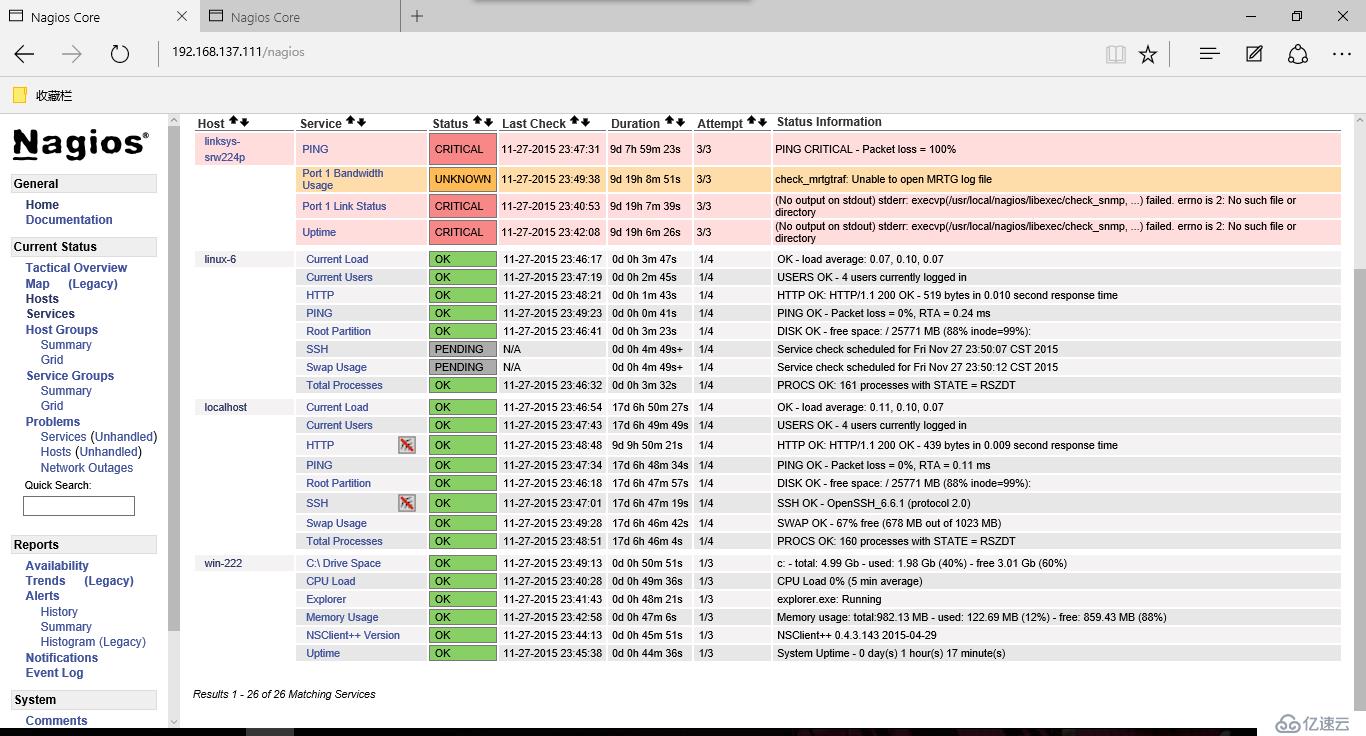
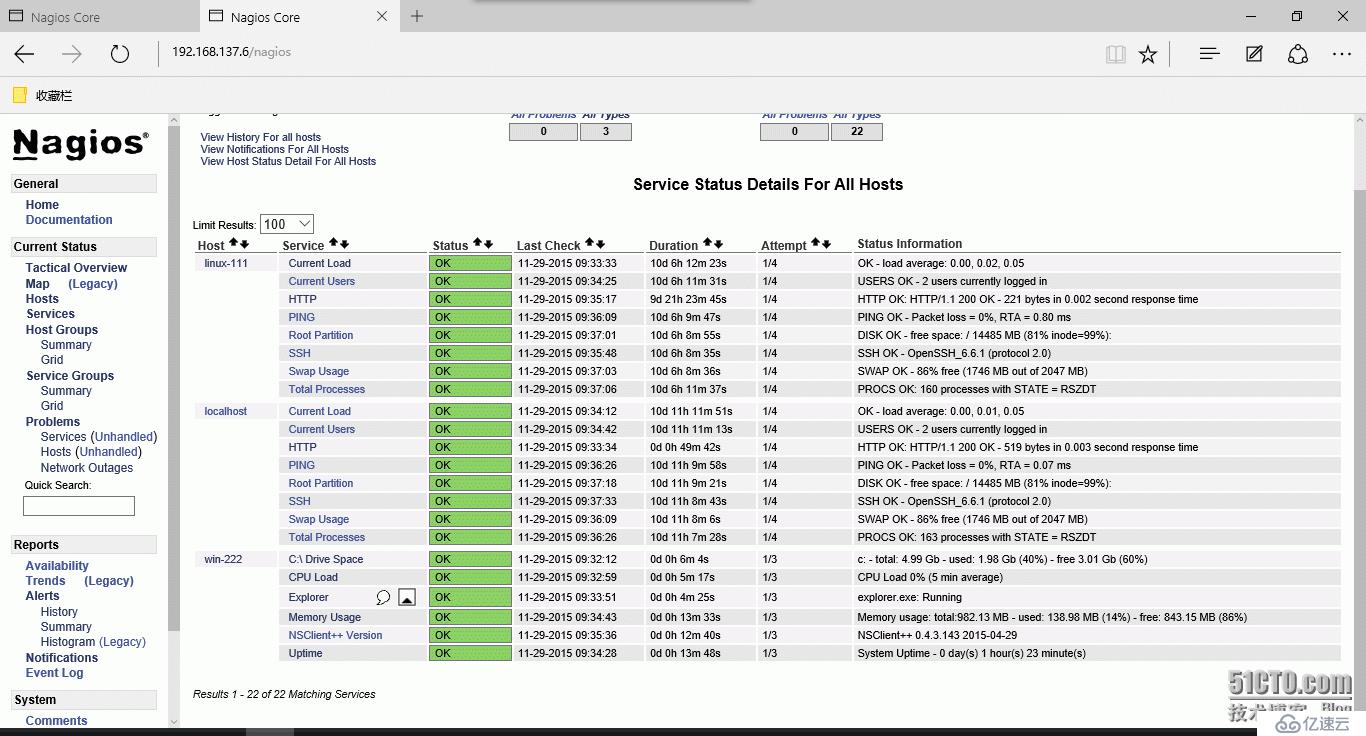
#效果图示,可以看到已经正常监控到windows各项服务
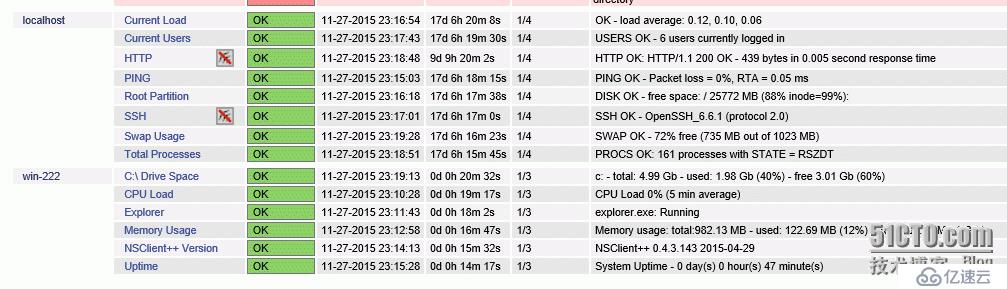
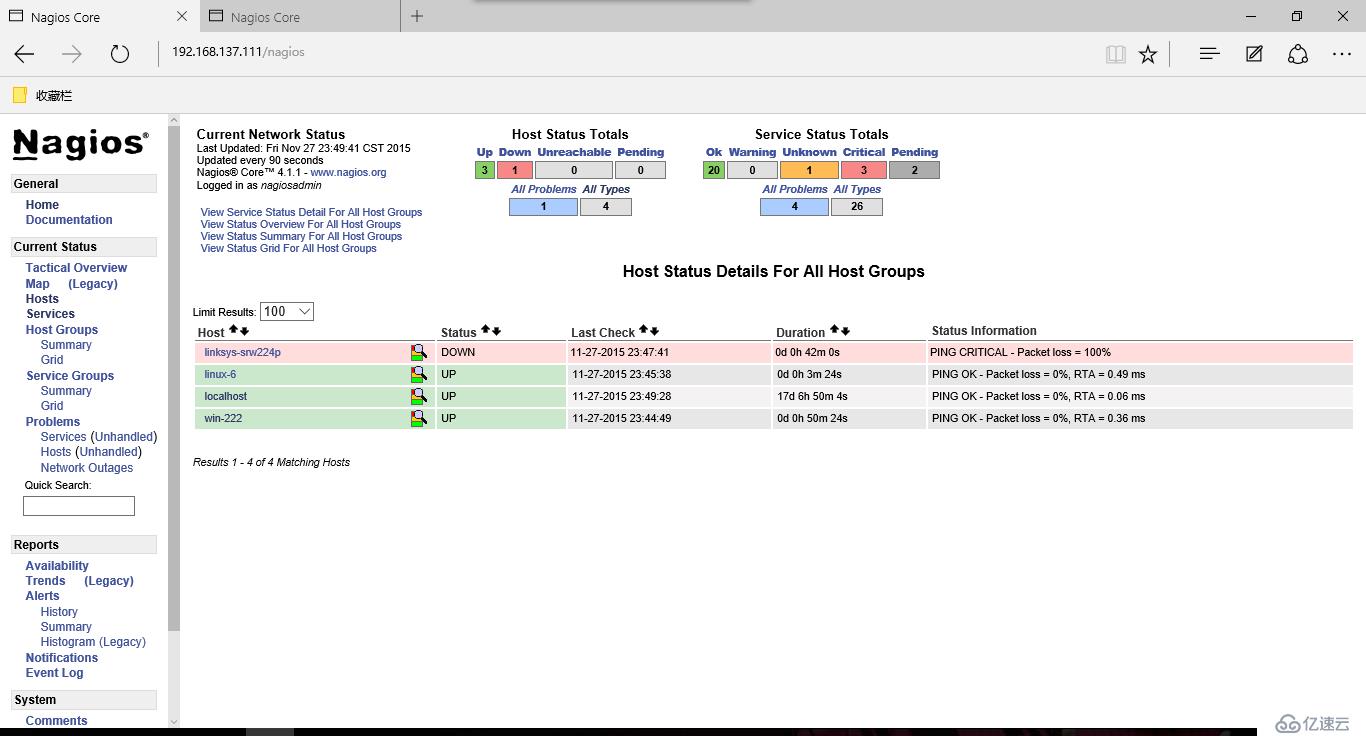
4、监控linux主机
#监控IP为192.168.137.6的linux主机,分别监控ping、root分区使用情况、现存用户情况、进程数、实时负载、swap使用情况、ssh和httpd进程
define host{
use linux-server ; Name of host template to use
; This host definition will inherit all variables that are defined
; in (or inherited by) the linux-server host template definition.
host_name linux-6
alias linux-6
address 192.168.137.6
}
define hostgroup{
hostgroup_name my-linux-servers ; The name of the hostgroup
alias My Linux Servers ; Long name of the group
members linux-6 ; Comma separated list of hosts that belong to this group
}
define service{
use local-service ; Name of service template to use
host_name linux-6
service_description PING
check_command check_ping!100.0,20%!500.0,60%
notifications_enabled 1
}
define service{
use local-service ; Name of service template to use
host_name linux-6
service_description Root Partition
check_command check_local_disk!20%!10%!/
notifications_enabled 1
}
define service{
use local-service ; Name of service template to use
host_name linux-6
service_description Current Users
check_command check_local_users!20!50
}
define service{
use local-service ; Name of service template to use
host_name linux-6
service_description Total Processes
check_command check_local_procs!250!400!RSZDT
notifications_enabled 1
}
define service{
use local-service ; Name of service template to use
host_name linux-6
service_description Current Load
check_command check_local_load!5.0,4.0,3.0!10.0,6.0,4.0
notifications_enabled 1
}
define service{
use local-service ; Name of service template to use
host_name linux-6
service_description Swap Usage
check_command check_local_swap!20!10
notifications_enabled 1
}
define service{
use local-service ; Name of service template to use
host_name linux-6
service_description SSH
check_command check_ssh
notifications_enabled 1
}
define service{
use local-service ; Name of service template to use
host_name linux-6
service_description HTTP
check_command check_http
notifications_enabled 1
}
#在/usr/local/nagios/etc/nagios.cfg添加如下一行,并重新加载或者启动nagios
cfg_file=/usr/local/nagios/etc/objects/linux-6.cfg
/etc/init.d/nagios restart
/etc/init.d/nagios reload
systemctl restart nagios
systemctl reload nagios

5、邮件报警设置
5、邮件报警设置
#在/usr/local/nagios/etc/object/contact.cfg下修改为
#定义两个Nagios Admin邮箱地址,并隶属于admins组
define contact{
contact_name nagiosadmin ; Short name of user
use generic-contact ; Inherit default values from generic-contacttemplate (defined above)
alias Nagios Admin ; Full name of user
email nagiosadmin@dnstest.com ; <<***** CHANGE THIS TO YOUR EMAIL ADDRESS******
}
define contact{
contact_name nagiosroot ; Short name of user
use generic-contact ; Inheritdefault values from generic-contact template (defined above)
alias Nagios Admin ; Full name of user
email nagiosroot@dnstest.com ;<<***** CHANGE THIS TO YOUR EMAIL ADDRESS ******
}
define contactgroup{
contactgroup_name admins
alias Nagios Administrators
members nagiosadmin,nagiosroot
}
#在/usr/local/nagios/etc/object/win-222.cfg中添加"notifications_enabled 1"启用邮件报警,如修改为
define service{
use generic-service
host_name win-222
service_description C:\ Drive Space
check_command check_nt!USEDDISKSPACE!-l c -w 80 -c90
notifications_enabled 1
}
define service{
use generic-service
host_name win-222
service_description Explorer
check_command check_nt!PROCSTATE!-d SHOWALL -lexplorer.exe
notifications_enabled 1
}
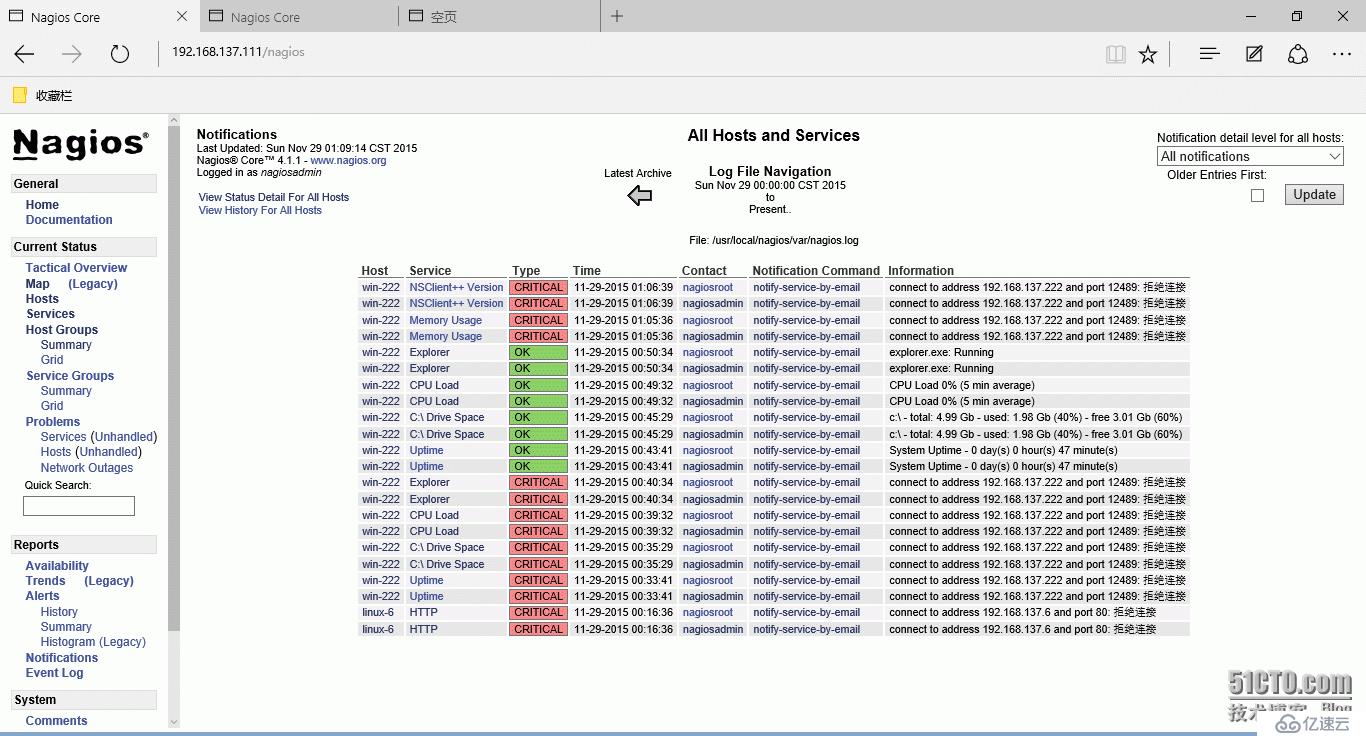
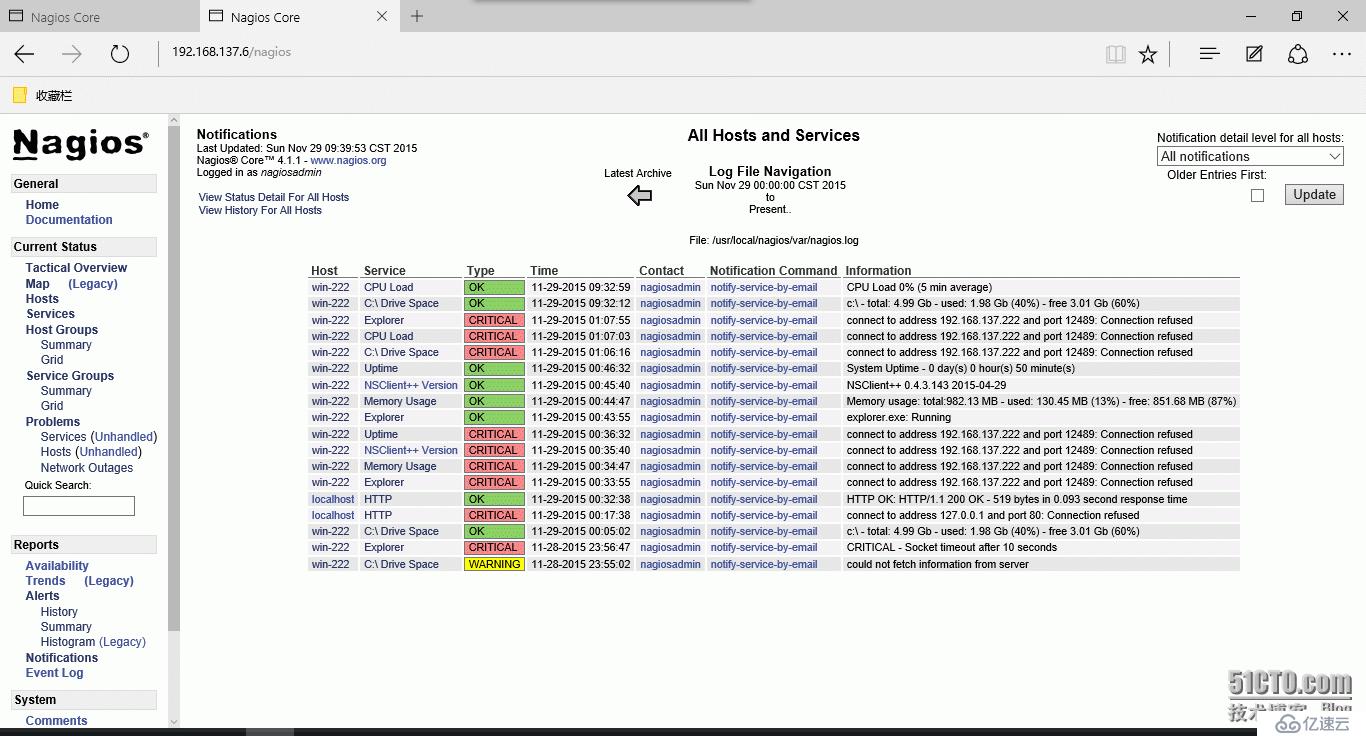
#到192.168.137.222这台windows主机将nsclient++服务停止或直接禁用网卡模拟故障
#查看nagiosadmin@dnstest.com和nagiosroot@dnstest.com有没有收到邮件
#可以查看/var/log/messages日志文件看有没有发送日志记录
#故障后邮件报警


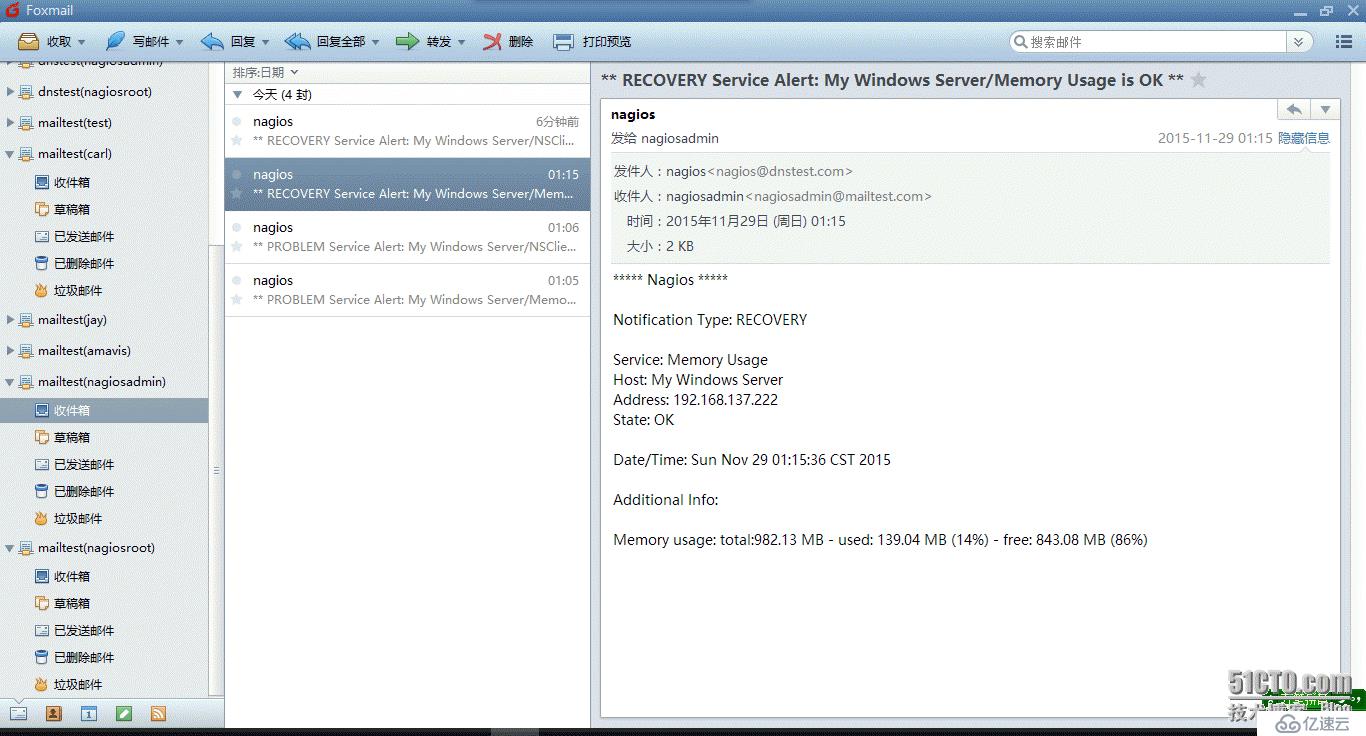
#故障恢复后的邮件通知
6、短信通告
免责声明:本站发布的内容(图片、视频和文字)以原创、转载和分享为主,文章观点不代表本网站立场,如果涉及侵权请联系站长邮箱:is@yisu.com进行举报,并提供相关证据,一经查实,将立刻删除涉嫌侵权内容。


