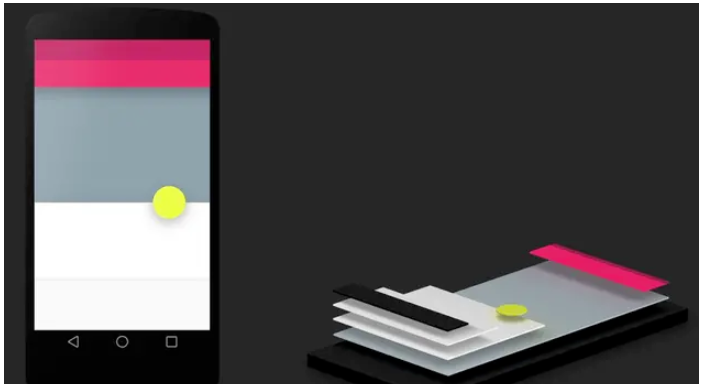
这篇文章主要介绍了Android怎么实现阴影效果的相关知识,内容详细易懂,操作简单快捷,具有一定借鉴价值,相信大家阅读完这篇Android怎么实现阴影效果文章都会有所收获,下面我们一起来看看吧。
Material Design提供了View的阴影效果设置。主要由两个属性决定:elevation和translationZ。
Z = elevation + translationZ
PS:这种实现方式只有API21以及以上才能支持实现。
elevation属性表示View高度加上高度就会有阴影效果。 translationZ属性表示给View增加一个Z轴的变换效果。配合elevation属性一起使用阴影效果更突出。
<androidx.appcompat.widget.LinearLayoutCompat
    android:layout_margin="15dp"
    android:layout_width="match_parent"
    android:layout_height="100dp"
    android:background="@android:color/holo_blue_bright"
    android:elevation="10dp"
    android:translationZ="10dp"
    android:paddingBottom="10dp"
    />

官网介绍

CardView是Android提供的官方控件自身支持设置阴影效果。阴影实现由cardElevation和cardMaxElevation实现。
<androidx.cardview.widget.CardView
    android:layout_margin="15dp"
    android:layout_width="match_parent"
    android:layout_height="100dp"
    android:outlineAmbientShadowColor="@android:color/holo_blue_bright"
    android:outlineSpotShadowColor="@android:color/holo_red_dark"
    app:cardElevation="5dp"
    app:cardMaxElevation="10dp"
    />

若是TextView则可以通过shadow属性实现阴影效果
<TextView
android:id="@+id/test_shadow"
android:layout_gravity="center"
android:layout_height="wrap_content"
android:layout_width="wrap_content"
android:shadowColor="#aa22ff22"
android:shadowDx="0"
android:shadowDy="0"
android:shadowRadius="10"
android:text="Test Shadow"
android:textColor="#cc000000"
android:textSize="60sp" />
通过配置xml的layer属性文件实现阴影效果。使用layer-list实现两层不同背景色实现叠加实现像是阴影的效果,但最终实现效果并不是例如CardView的渐变阴影效果。
<?xml version="1.0" encoding="utf-8"?>
<layer-list xmlns:android="http://schemas.android.com/apk/res/android">
    <!-- 阴影图片,android:left表示阴影图片左边到背景图片左边的距离
    android:top表示阴影图片上边到背景图片上边的距离-->
    <item android:left="5dp"
        android:top="5dp">
        <shape>
            <solid android:color="#60000000"/>
        </shape>
    </item>
    <!-- 背景图片,android:right表示阴影图片右边到背景图片右边的距离
    android:bottom表示阴影图片下边到背景图片下边的距离-->
    <item android:bottom="5dp"
        android:right="5dp">
        <shape>
            <solid android:color="#000000"/>
        </shape>
    </item>
</layer-list>

自定义形式是通过自定义Drawable实现,该形式实现目标View必须关闭硬件加速。自定义Drawable主要通过重写draw方法绘制矩形或圆形形状增加阴影效果。
@Override
public void draw(@NonNull Canvas canvas) {
    if (mBgColor != null) {
        if (mBgColor.length == 1) {
            mBgPaint.setColor(mBgColor[0]);
        } else {
            mBgPaint.setShader(new LinearGradient(mRect.left, mRect.height() / 2, mRect.right,
                    mRect.height() / 2, mBgColor, null, Shader.TileMode.CLAMP));
        }
    }

    if (mShape == SHAPE_ROUND) {
        canvas.drawRoundRect(mRect, mShapeRadius, mShapeRadius, mShadowPaint);
        canvas.drawRoundRect(mRect, mShapeRadius, mShapeRadius, mBgPaint);
    } else {
        canvas.drawCircle(mRect.centerX(), mRect.centerY(), Math.min(mRect.width(), mRect.height())/ 2, mShadowPaint);
        canvas.drawCircle(mRect.centerX(), mRect.centerY(), Math.min(mRect.width(), mRect.height())/ 2, mBgPaint);
    }
}| 实现方式 | 优缺点 |
|---|---|
| elevation | 优点:自带功能实现简单 缺点:不可自定义颜色 |
| CardView | 优点:自带功能实现简单 缺点:自带圆角不一定可适配所有需求 |
| Textshadow | 优点:自带功能实现简单 缺点:只可在TextView中使用 |
| layer | 优点:实现形式简单 缺点:效果一般 |
| 自定义实现 | 优点:实现效果好可配置能力高 缺点:需要开发者自行开发 |
关于“Android怎么实现阴影效果”这篇文章的内容就介绍到这里,感谢各位的阅读!相信大家对“Android怎么实现阴影效果”知识都有一定的了解,大家如果还想学习更多知识,欢迎关注亿速云行业资讯频道。
免责声明:本站发布的内容(图片、视频和文字)以原创、转载和分享为主,文章观点不代表本网站立场,如果涉及侵权请联系站长邮箱:is@yisu.com进行举报,并提供相关证据,一经查实,将立刻删除涉嫌侵权内容。